Riding tube-to-sheet welding requires root penetration and good back forming, so the operation is more difficult. According to different spatial positions, the sitting tube-sheet welding can be divided into three types: vertical fixed flat fillet welding, vertical fixed elevation angle welding and horizontal fixed fillet welding.
Today I will talk to you about the vertical fixed welding of the riding tube sheet.
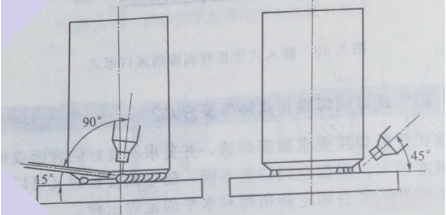
See the figure below for the angle between the welding torch, welding wire and workpiece.
Tack welding is usually welded by the intermittent wire filling method. The length and number of tack welds are determined according to the diameter of the pipe, generally 2 to 4 sections, each section is 10 to 20mm long. When backing welding, first strike the arc on the tack weld, swing the arc in situ, and wait for the tack weld to melt to form a stable molten pool, then fill the wire and weld to the left to ensure that the back is well formed.
During the welding process, the molten pool should be observed at any time, and the angle between the welding torch and the bottom plate should be adjusted appropriately to ensure that the size of the molten hole is consistent and prevent burn-through. When welding to other tack welds, the wire feeding should be stopped or reduced to melt the tack welds and make a smooth transition with the previous bottom welds.
When the arc is extinguished, press the switch, the current begins to decay, and the wire feeding stops after the arc crater is filled. After the arc is extinguished, the molten pool solidifies. At this time, the welding torch and welding wire should continue to be kept in place, and the welding torch should be removed after the gas supply is stopped. When connecting, strike the arc at a position 10-15 mm behind the arc crater, and move the arc to the joint at a slightly faster speed; after the original arc crater melts to form a molten pool, then normally fill wire welding. If there is a local bulge on the bottom welding bead, use an angle grinder to grind it flat before performing cover welding.
During filling welding or cover welding, the swing range of the welding torch is slightly larger, so that the groove edges of the pipe and the plate are fully melted. The filling weld should not be too wide or too high, and the surface should be flat.
Cover welding sometimes requires two welds, and the lower one should be welded first, followed by the upper one. When welding the bead below, the arc swings around the lower edge of the bottoming bead, and the upper edge of the molten pool is controlled at 1/2 to 2/3 of the bottoming weld, while the lower edge of the molten pool is controlled at the slope 0.5-1.5 mm below the lower edge of the mouth. When welding the upper bead, the arc should swing around the upper edge of the bottoming bead, so that the upper edge of the molten pool exceeds the upper edge of the groove by 0.5-1.5mm, and the lower edge of the molten pool transitions smoothly with the lower bead to ensure that the weld seam The surface is smooth and even.
Post time: Mar-01-2023


