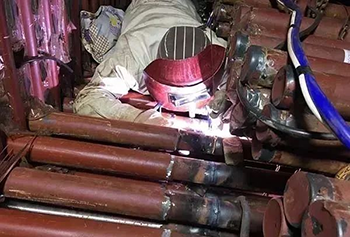
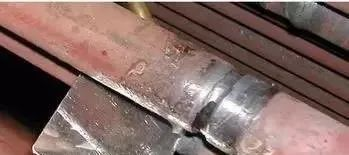
1. Original record of mirror welding
Mirror welding is a welding operation technology based on the principle of mirror imaging and uses mirror-assisted observation to control the welding operation process. It is mainly used for welding of welds that cannot be directly observed due to the narrow welding position.
Xinfa welding equipment has the characteristics of high quality and low price. For details, please visit: Welding & Cutting Manufacturers – China Welding & Cutting Factory & Suppliers (xinfatools.com)
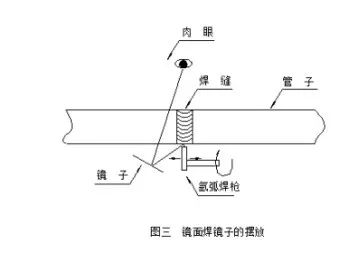
The fixed position of the mirror generally has two requirements. First, it must be convenient for the naked eye to observe the condition of the molten pool through the reflection of the mirror. Second, it must not affect the position of the argon arc welding gun and the walking and swinging of the welding gun during the welding process. The distance between the mirror and the weld seam The relative position of the tube rows is adjusted depending on the spacing.
2. Preparation before welding
(1) The spot welding gap should be strictly controlled, generally 2.5~3.0 mm. The spot welding seam position should be on the front of the pipe.
(2) Lens placement: Place the lens in the area where welding begins in a vertical manner, and use a welding gun to simulate the trajectory during welding to adjust the distance and angle of the lens so that the lens is in the best position for welding observation.
(3) Check that the argon gas flow rate is generally 8~9 L/min, the tungsten electrode extension length is 3~4 mm, and the arc curvature of the welding wire is pre-prepared.
3. Analysis of difficulties in mirror welding
(1) Mirror imaging is reflection imaging. During the welding operation, the operation seen by the welder in the radial direction of the pipe mouth is opposite to the actual direction. During the welding process, it is easy to feed the wire to the molten pool in the mirror. , affecting normal welding.
Therefore, the swing of the welding arc and the wire-filling movements are difficult to be coherent, consistent, and coordinated, which can easily cause the arc to be too long, tungsten to be pinched, the wire-filling to be insufficient, and the end of the welding wire to collide with the tungsten electrode.
(2) The lateral swing and movement of the welding arc are not flexible enough, which can easily lead to incomplete penetration of the root, concavity, lack of fusion, undercutting, and poor forming. If the welding speed is too slow, defects such as pores can easily occur.
(3) When observing the molten pool through a mirror, the arc light reflection is very strong and it is difficult to see the tungsten rod clearly. When feeding the wire, it is easy to cause the welding wire to collide with the tungsten rod, deforming the tip of the tungsten rod, affecting the arc stability, and easily causing defects such as tungsten inclusion. .
(4) The weld seam seen through the mirror is a flat image. The three-dimensional effect of the weld seam in the mirror is not strong, and the mirror images of the arc light and the molten pool are superimposed on each other. The arc light is too strong, and it is difficult to clearly distinguish the molten pool, so the weld seam The control of thickness and straightness will directly affect the quality of welding seam formation.
4. Mirror welding operation method
(1) Base layer welding
a.Inner wire method
Place the welding gun in the area where the welding begins to strike the arc, and transport the welding wire through the groove gap on the front to the arc burning area on the back. Observe the forming of the root with the naked eye, and also observe the arc burning and appearance forming in the lens from time to time. . Use the “two slow and one fast” method to operate the welding gun.
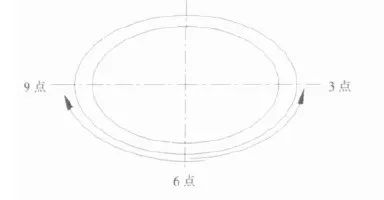
Control the thickness of the base layer at 2.5~3.0 mm. Weld from 6 o’clock to 9 o’clock, and then weld from 6 o’clock to 3 o’clock. Complete the base layer welding according to the sequence shown in Figure 2.
b.External silk method
First, pre-prepare the arc for the amount of welding wire, then fix the welding gun mouth on the pipe weld bead at an angle of 60°, start the arc, and pay attention to the wire feeding situation of the arc and molten pool in the lens.
The wire can be fed continuously or with arc interruption. The reflection of the lens can easily mislead the operation: for example, it is difficult to distinguish between the actual welding wire and the welding wire reflected in the lens, which can easily lead to insufficient wire feeding, excessive molten pool temperature, and damage to the tungsten. Extremely, defects such as pores and depressions appear.
Therefore, the operation is to devote oneself to the reflection of the mirror, and consciously hook the arc curvature of the welding wire into the groove to feed the wire evenly. The welding gun is operated using the “two slow and one fast” method, and the angle of the welding gun is adjusted according to the arc in the lens.
Avoid tilting the welding gun too much, causing the arc to be too long and the base layer to be too thick, to prevent defects such as incomplete penetration. When welding is between 8 o’clock and 9 o’clock, part of the actual arc can be seen, and the operation can be combined with the actual situation and the mirror surface.
Complete 1/4 of the pipe mouth weld and then start mirror welding of another 1/4 of the weld. The joint at the 6 o’clock position is one of the important operations of mirror welding, and defects are most likely to occur during reverse operation.
During operation, to ensure the quality of the joint, the arc should be ignited at about 8~10 mm of the front weld of the joint, and then the arc should be brought steadily to the joint of the front weld at 6 o’clock. When a molten pool is formed at the joint Then add welding wire for normal mirror welding operation.
Finally, complete the primer welding on the front side (non-mirror welding) according to the sequence in Figure 2, and the sealing is completed.
(2) Cover layer welding
1) Difficulty analysis
Because the position of the weld in the mirror is opposite to that of the real object, it is easy to cause undercuts, unfused edges of the grooves, unfused internal layers, pores, or damage to the tungsten electrode during operation.
2) Cover welding operation requirements
Before welding, the trajectory of the welding gun must be simulated, and the angle of the lens and the arc curvature of the pre-prepared amount of welding wire must be adjusted.
During the welding operation, you should first align the welding gun mouth at the 6 o’clock position of the groove at an angle of 60° for arc preheating. After preheating, with the brightness of the arc light, extend the pre-curved welding wire from the side of the pipe to the arc burning point in the lens. Position, feed wire. The best way to feed wire is to hook the welding wire with arc curvature to the welding seam of the pipe, slowly feed the wire continuously and evenly into the molten pool, and watch the growth of the edge of the welding seam and the transition of molten droplets in the lens. process and the arc length of the tungsten electrode tip,
According to the “two slow and one fast” welding method, move to the 9 o’clock position in the mirror surface to complete the 1/4 cover surface welding and extinguish the arc. Then move the lens to the other 1/4 of the back weld for trajectory simulation adjustment and fixing. Improper operation of the interface at 6 points will also cause welding defects, and it is a dense section where defects occur.
It is best to start arc heating at the front weld at 6 o’clock. When the joint melts into a molten pool, add the welding wire to perform normal mirror welding operation. Pay attention to the melting condition of the edge and follow the method of the first 1/4. Operate until the arc goes out at 3 o’clock and stops.
Then weld the part being welded according to conventional methods to complete the cover layer welding of the entire pipe.
5. Precautions
①The placement skills of the mirror are very important. The farther the lens is from the real object or the less parallel it is to the real object, the greater the accuracy of the operation will be;
②The farther the lens and object are from the operator, the more difficult the operation will be;
③ The gap between the two parts must be strictly controlled, the angle of the welding gun must be appropriate, welding must be in order, and the feeling of adding wire in the mirror must be clear.
Post time: Nov-06-2023


